


The Trophy Club - Caddie Sheets
Back to The Trophy Club's Main Page
|
Hole |
Yardage |
Photo From Tees |
Photo Landing Area to Green |
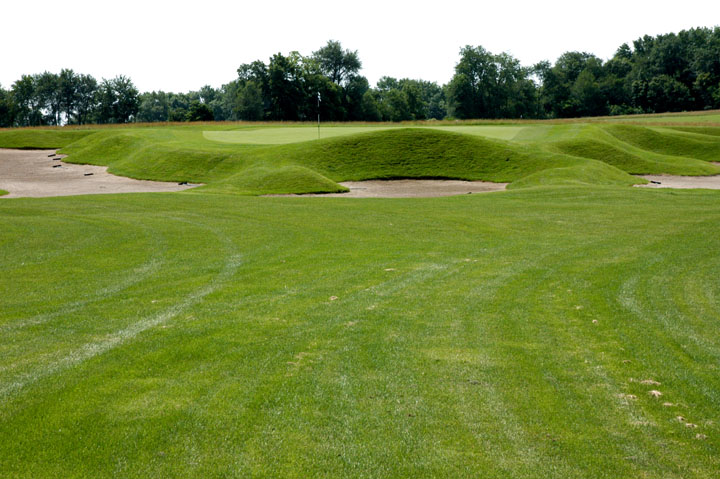
Photo Approach/Green |
Caddie Tips |
|
#1 Par 4 HC - 11 |
Black 483 Blue 431 White 389 |
 |
 |
 |
Very open starting drive (~55yd wide fairway). Best drive position is to the left half of the fairway for extra distance and best approach. Approach to deep, swaying green. Front 20% slopes moderately to front. Back 25% slopes gently to the back. |
|
#2 Par 5 HC - 5 |
Black 576 Blue 504 White 456 |
 |
 |
 |
Tee shot involves a 30yd wide ditch running parallel to the fairway. Long hitters can target the right side of the ditch by hugging the last trees on the right (fairway begins at 245 from CG). If targeting the left side on the drive, there is little advantage of driving to narrow fairway past the left bunkers. |
|
#3 Par 4 HC - 7 |
Black 445 Blue 402 White 370 |
 |
 |
 |
Approach to wide fairway that begins to narrow at 145yd from CG. Right bunker begins at 148yd from CG. Deep (39yd) green is mostly flat. Misses to the right have 4-7ft grass bank and light rough only. |
|
#4 Par 3 HC - 15 |
Black 212 Blue 194 White 160 |
 |
 |
Grass bunkers to the right and left. Deep (42yd) green has moderate sways jetting 15ft into center green from each of the bunker mounds. | |
|
#5 Par 4 HC - 13 |
Black 332 Blue 299 White 270 |
 |
 |
 |
Long hitters will want to draw the ball to left edge of fairway to allow for close positioning to green. Approach shot involves a wide ridge into the 37yd deep green originating with the large, right bunker - releasing balls to the right side of the green landing in the front 15% to the left; and balls to the back 25-80% long. |
|
#6 Par 4 HC - 3 |
Black 464 Blue 422 White 383 |
 |
 |
 |
Wide fairway gives plenty of drive room. Last bunker on right begins at 83yd from CG. Tees hit to left side of fairway kick to the right. Approach to deep (43yd) green. A deep and wide (6yd) "dip" runs across green at 33% depth. Keep short if pin is in the "dip" and allow ball to release into the depression. |
|
#7 Par 4 HC - 9 |
Black 421 Blue 402 White 350 |
 |
 |
 |
Club selection off tee is essential. Drives can easily go through the fairway to the left bunker. Best drives play to the right edge of fairway. Approach to another deep (36yd), swaying green. Ridge snakes across at 65% depth causing balls in back to release long and those shy to hold more abruptly. |
|
#8 Par 3 HC - 17 |
Black 214 Blue 183 White 150 |
 |
 |
Pin position determines club selection. Very deep (47yd) green has two long ridges from left front bunkers across green. Most of green releases slightly to the right. | |
|
#9 Par 5 HC - 1 |
Black 576 Blue 528 White 492 |
 |
|
 |
From front of black tees, drive requires 284yd to clear center bunker - then 75yds following is the next right bunker. Green is well protected, any second or third shot into the green from behind the fairway's bend must reach the green in air. Approach to a kidney-shaped green (18yd deep and 39yd wide) that slopes gently out from center green. |
| Par 36 |
Black 3723 Blue 3365 White 3020 |
|
Hole |
Yardage |
Photo From Tees |
Photo Landing Area to Green |
Photo Approach/Green |
Caddie Tips |
|
#10 Par 4 HC - 12 |
Black 356 Blue 327 White 313 |
 |
 |
 |
Drives should consider a slight angling of the fairway to the left. From the back of the black tees, the second bunker on the left is 244yds. Approach to a 34yd deep green that slopes toward the front in the front 10%. Back of the green is a "table-top" with 10ft of outside edges all sloping heavily to the fringe. |
|
#11 Par 5 HC - 2 |
Black 553 Blue 501 White 470 |
 |
 |
 |
From back of black tees, takes 318yd to reach the beginning of the third bunker - meaning golfer must decide right or left. On second shot up the hill, fairway bunkers begin at 150yd from CG and end at 51yd from CG. Approach into a complex green. 42yd deep, 21yd wide. Front/left corner slopes hard off the green. Right/middle slopes moderately off the green. Back is relatively level. |
|
#12 Par 4 HC - 14 |
Black 337 Blue 314 White 305 |
 |
 |
 |
Left bunker is 226yd from the back of the black tees. From the middle of the white tees, any fade has to be started at the first left bunker. Approach into a swaying, 36yd deep green. Front/right releases to the right. Front/left releases to the left. Back is relatively level except for a depression on the back left corner. |
|
#13 Par 4 HC - 4 |
Black 481 Blue 431 White 391 |
 |
 |
 |
Tee shot into a bending fairway (to left) at 175yd from CG. Approach to 36yd deep green with creek to right and closely hugging the back. Complex green. Green has two sways (not quite tiers), one at 50% depth and one at the very back. Front/center of green releases to the left. Center/right of the green releases long. |
|
#14 Par 3 HC - 18 |
Black 202 Blue 163 White 141 |
|
 |
36yd deep, swaying green. Front 15% slopes to the front. Left/center and right/center are depressed and capture balls. Back 25% is mostly flat with only the center area releasing long. | |
|
#15 Par 4 HC - 10 |
Black 422 Blue 401 White 366 |
 |
 |
 |
Front of fairway bunker is 136yd from CG. End of fairway bunker is at 130yd from CG. Fairway drops 15ft in elevation abruptly after the bunker. Green is 36yd deep. Approaches missing left will find a fairway depression. Front 30% of green slopes moderately toward fringes. Back of green is flat. |
|
#16 Par 5 HC - 8 |
Black 519 Blue 481 White 448 |
 |
 |
 |
Hugging left edge will aid in a reachable second shot. Hazard (stream) runs all along left edge of fairway all the way to the green. Approach to 39yd deep green with large ridge jetting into center green at 40% depth. Back right releases hard long; short right holds firmly. |
|
#17 Par 3 HC - 16 |
Black 220 Blue 191 White 173 |
 |
 |
 |
Very deep green with front 40% sloping moderately to the front. Back 60% slopes gently to the front. Ridge behind bunker in right/middle only gently releases forward. |
|
#18 Par 4 HC - 6 |
Black 467 Blue 406 White 379 |
 |
 |
 |
Best drives stay just left of the right-side bunkers (the first beginning at 244yd from CG; last bunker ends at 127yd from CG). On approach, sway at 33% depth holds balls short or pushes them long. In back, 75% of the right side slopes gently to the right. |
|
Par 36 |
Black 3557 Blue 3215 White 2986 |
||||
|
Par 72 |
Black 7280 Blue 6580 White 6006 |